Learn how to set up indoor solar lights step by step for a brighter, eco friendly home with simple installation tips and placement advice for best results.
Setting up the best solar indoor light for home use is easier than most people expect, and it does not require complex wiring or technical skills. With the right panel placement, proper mounting, and smart cable routing, you can create a reliable, eco friendly lighting setup in just a short time. A correct installation not only improves brightness but also helps the battery charge faster and last longer. Here is a simple, practical guide to get everything installed the right way.
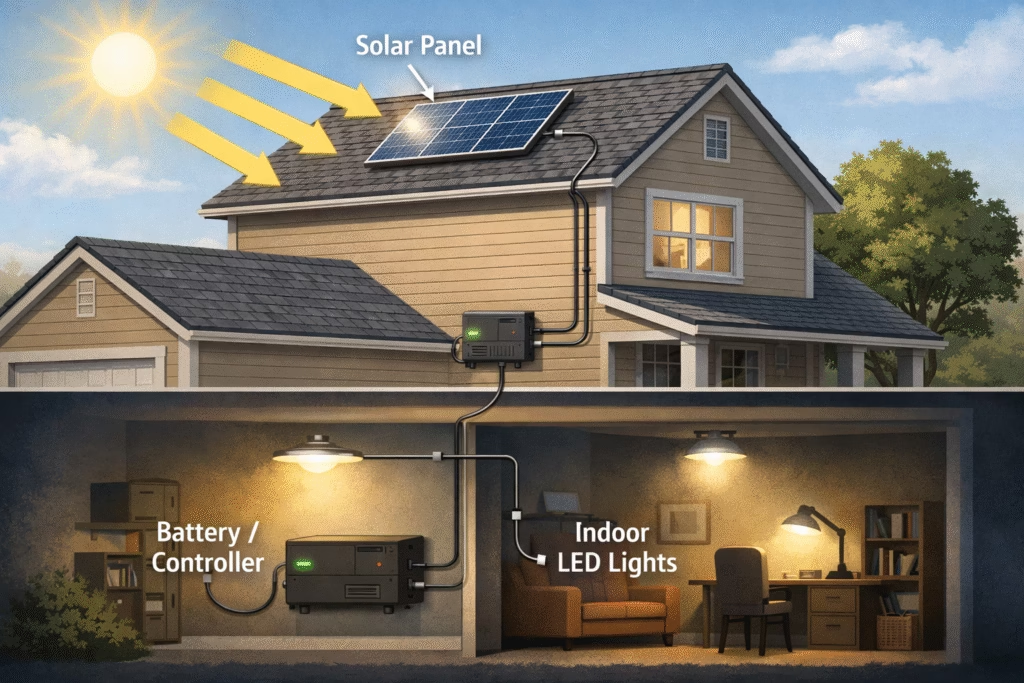
Solar indoor lighting systems bring natural, free energy into your home without relying on the electrical grid. Unlike traditional lights that draw power from your home wiring, solar indoor lights use a solar panel outside to capture sunlight, store that energy in a battery, and then power LED lights indoors at night. Our Solar Indoor Light Handbook covers everything you need to know about choosing and installing these systems for your space.
Most solar indoor kits include:
- A solar panel that you mount where sunlight reaches it.
- A battery or battery box that stores energy captured during the day.
- LED light fixtures that plug into the battery or controller box.
- A charge controller that protects the battery from overcharging.
These systems are essentially plug-and-play and don’t need complex mains wiring. You can have lights working indoors while the panel sits outside in the sun. That makes solar indoor lighting attractive where wiring is difficult.
1. Planning Your Installation
Survey Sunlight and Choose Panel Location
Your solar panel must get sunlight during the day. For most places this means finding a spot that gets at least 5 to 8 hours of direct sun each day.
Ideally mount the panel on a roof, wall, or balcony where it won’t be shaded by trees or buildings.
Ensure the panel faces the general direction of the sun (south in the Northern Hemisphere) for best results.
Southern U.S. states (Texas, Florida, Arizona):
A tilt of 25–30 degrees works well year-round.
Central U.S. states (California, Illinois, Colorado):
A tilt of 30–40 degrees captures sunlight efficiently.
Northern U.S. states (New York, Michigan, Washington):
A tilt of 40–45 degrees helps collect more winter sunlight.
Decide how many indoor solar lights you need and where they will be most useful
Living rooms or larger areas may need brighter or multiple lights.
Task areas like reading corners or desks may only need one or two focused lights.
Garage, utility room, or hallways can use simple LED fixtures.
Measure distances so you know how much cable you’ll need. Most kits include between 10 and 20 feet of cable, but extension cables might be required for bigger rooms.
Gather Tools and Materials
Before you start installing, make sure you have:
A screwdriver and drill for panel mounting.
Mounting screws, anchors, or brackets for the solar panel.
Wire clips or cable ties to secure light cables neatly along walls or ceilings.
A ladder if panel or lights are going high up.
2. Mounting the Solar Panel and Wiring Basics
Installing the Solar Panel
Once you’ve planned your system and found a good sunny spot for the panel, the actual mounting is straightforward.
Mark and Prepare Mounting Points
Use the mounting bracket that came with the panel to mark where you’ll drill holes. A ladder and pencil will make this easier.
Outdoor panels should get direct sun for at least 5 to 8 hours daily to charge well.
Drill Holes and Install Anchors:
Drill appropriate holes in the wall, roof, or window frame. Insert wall anchors if needed, then secure the bracket with screws.
Attach the Panel
Clip the panel onto the bracket and tighten screws so it won’t move in wind or rain. A tilt angle of about 15–30 degrees toward the sun helps capture energy more efficiently.
Orientation Is Important
In the Northern Hemisphere, panels should face south for best sun exposure.
Connecting the Solar Panel to the Charge Controller
Most solar indoor lighting systems include a charge controller. It sits between the solar panel and the battery to regulate how power flows and prevent overcharging.
Match Polarity:
Solar panel cables are usually red (+) and black (-). Connect the panel to the controller’s PV input, making sure + goes to + and – goes to -.
Wire From Panel to Controller
Use appropriate insulated cables (solar PV wire if possible). This basic wiring ensures energy flows from panel to controller safely.
Check Controller Indicator Lights
Most controllers have small LEDs or labels showing charging status. With direct sunlight on the panel, you should see the battery charging.
3. Basic Safety Tip
Even a small solar panel can produce voltage. Never assume the system is off while there’s sunlight. Handle all wires carefully and keep them tidy with clips or cable ties.
Wiring LED Lights, Mounting Indoors, and Testing
Running Wires to Indoor Lights
After the controller is connected, you’ll connect your lights:
Plan Your Route:
Decide the paths for cables from the controller/battery to each light. Keep cables neat and secured with clips or conduits.
Connect Switches and Lights:
If your kit includes manual switches, connect them in line with the light cables. Then plug or wire the LED light fixtures as instructed.
Observe Connector Types:
Some systems use plug-and-play connectors, others might use basic screw terminals. Either way, match polarity and tighten all connections.
4. Mounting the Indoor Light Fixtures
Secure the Holders:
Most LED lights come with simple fixtures you can mount with screws. Drill pilot holes, insert anchors if needed, and screw the holder to the ceiling or wall.
Install LEDs:
Place your LED bulbs into the holders. These are usually low-voltage LEDs that draw power from your solar battery.
Attach Cables:
Route the cables along walls or ceilings, securing them so they don’t hang loose. Use cable clips or conduits for a clean look.
5. Initial Testing:
Before you finalize everything:
Fully Charge the System
Leave the panel in sun until the battery reaches a full charge. Many small indoor solar kits will take about 4–6 hours of good sunlight to reach full charge.
Check Light Operation:
Turn switches on and make sure each LED lights correctly. If something doesn’t turn on, recheck the wire connections and polarity.
Verify the Controller Status:
Most charge controllers show whether the system is charging and whether the battery is full. This lets you know if you need to adjust panel angle or wiring.
6. Wiring and Connections
Good wiring keeps your system safe and efficient. Loose or incorrect connections can cause performance issues or safety risks.
Tips for safe wiring
Always match the positive (+) and negative (-) wires correctly at every connection point.
Avoid long, unprotected runs of cable. Keep wiring neat with clips or conduits so nothing gets pulled or pinched.
Place controllers in a dry, ventilated spot close to the battery to reduce cable length and energy loss.
Charge controller importance:
Never connect the solar panel directly to the battery without a controller. The charge controller protects the battery from overcharging and extending battery life. Skipping it can shorten battery life or damage it.
7. Maintenance, Safety, and Trouble-Shooting
Getting your solar indoor lighting system installed is only part of the job. To keep it working well and safely for years, you’ll want to follow some simple maintenance steps and know how to handle common issues.
Cleaning and Panel Care
Solar panels are most effective when they’re clean and facing direct sunlight. Dust, pollen, bird droppings, and pollution can lower output.
Clean the panel regularly
Wipe the panel surface with a soft cloth or sponge and mild water once every few weeks in dusty areas.
Avoid abrasive cleaners that can scratch the surface.
Keeping panels clean helps maintain steady charging performance. Dirty panels can absorb less sunlight and reduce how much energy reaches the battery.
Battery Health and Replacement
Your solar system’s battery stores all the energy your panel gathers. Keeping it healthy is critical.
What to check
Batteries should be checked every few months for corrosion or loose connections.
If your system has indicator lights on a controller or battery box, use them to see charge status. Some systems show colored lights to indicate battery levels.
Charging routine
Recharge batteries fully before heavy use. If left unused for long periods, recharge every few months.
Replacement
Rechargeable solar batteries typically last 2 to 5 years depending on type, usage, and care. If you notice rapid drops in performance or lights fading earlier than usual, it may be time for a new battery.
8. Safety Tips
Following a few safety practices protects you and your system.
Disconnect before work:
If you need to adjust wiring or replace parts, disconnect the panel from the controller or battery first.
Dry and shaded wiring locations:
Keep controllers and battery boxes in dry locations away from direct rain or moisture. Controllers especially should be shielded from harsh conditions.
Avoid short circuits:
Always use insulated cables and secure connectors. Short circuits can damage components and create fire hazards.
Follow local codes
When in doubt, refer to local electrical codes or ask a qualified electrician. Even small indoor wiring projects benefit from proper grounding and compliance.
9. Common Problems and Fixes
Light won’t turn on at night
Check the panel exposure. Less sun means less charge to the battery.
Make sure the panel wires are correctly connected to the controller and battery.
Test the battery voltage. If it’s too low, recharge fully.
Lights dim or flicker
Loose wiring or bad contacts are often the cause. Secure all connections.
Older batteries lose capacity over time. If dimming gets worse, consider replacing the battery.
Battery won’t charge:
Dirty solar panel. Clean the panel surface.
Incorrect wiring polarity. Double-check + and − on panel, controller, and battery.
Charge controller issue. Controllers can fail and may need replacement.
Longevity and Performance Expectations:
A well-installed solar indoor lighting system should give you reliable light at night and years of service with basic care.
Typical lifespan overview
Solar panels: 10–25 years
LED lights: up to 50,000+ hours*
Rechargeable batteries: 2–5 years (varies by type and use)
A maintenance habit — like cleaning panels every few weeks and checking battery connections quarterly — can extend performance and reduce surprises.