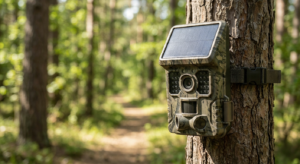
Discover best places to install solar powered security camera to maximize surveillance and solar charging efficiency.
Securing your property with a solar security camera system requires more than just choosing a quality device; strategic placement is critical to maximize both surveillance effectiveness and solar charging efficiency. Understanding optimal installation locations can mean the difference between comprehensive coverage and costly blind spots.
This guide explores the science-backed best practices for solar security camera placement for best solar security camera, combining surveillance principles with solar energy optimization to help you create a reliable, self-sustaining security system.
1: Why Strategic Placement Matters for Solar Security Cameras
Unlike traditional wired cameras, solar surveillance cameras face a unique challenge: they must balance surveillance requirements with solar panel positioning for continuous operation. A camera perfectly positioned for monitoring but placed in constant shade will quickly lose power, while one which is placed primarily for sunlight might miss critical areas.
Recent data shows that 34% of burglaries occur through front doors, making entry point coverage essential. However, your solar security camera placement must also account for the 4-6 hours of direct sunlight needed daily to maintain charge a consideration that becomes particularly important in northern climates or properties with significant tree coverage.
2: Optimal Installation Heights for Solar Security Cameras
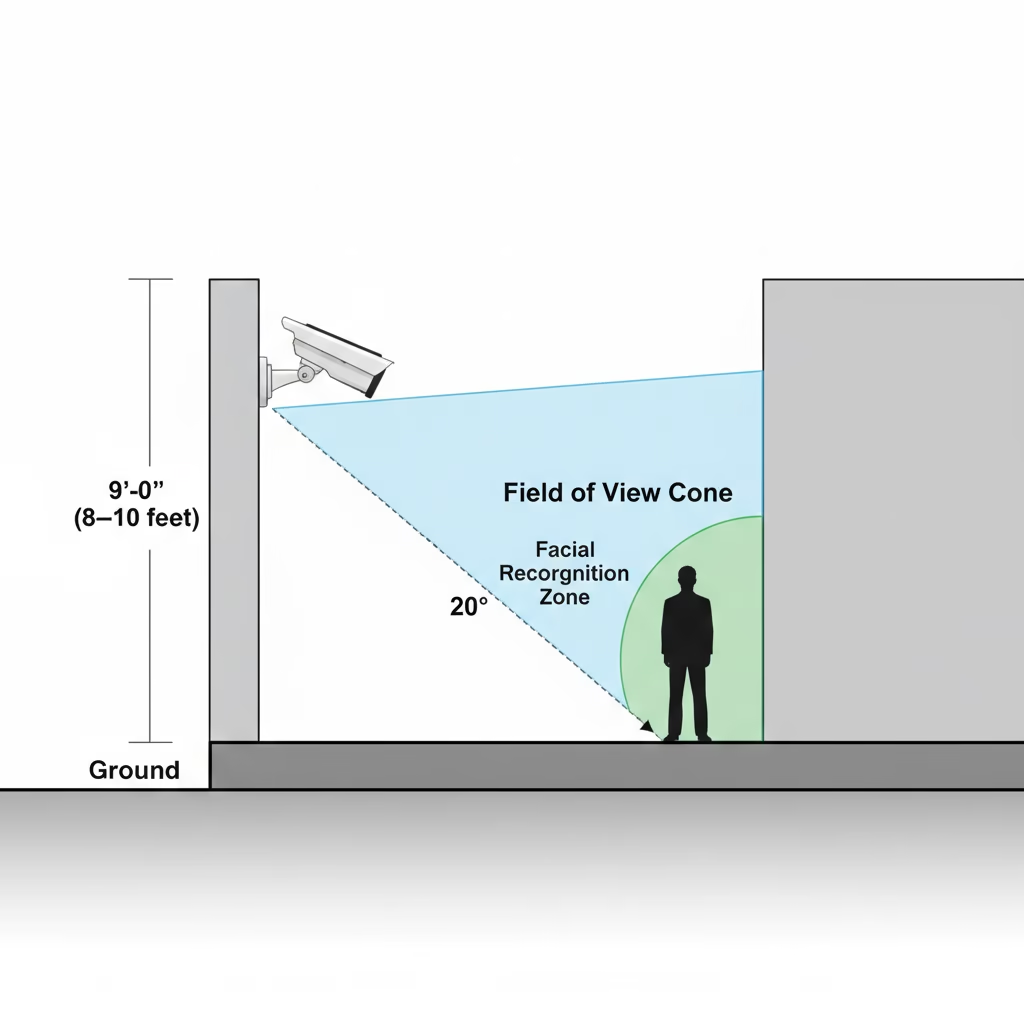
The 8-10 Foot Standard Security experts consistently recommend mounting cameras between 8-10 feet (2.4-3 meters) above ground level. This height provides several critical advantages:
- Facial recognition capability: Positioned at this elevation, cameras can capture clear facial details of anyone approaching.
- Tamper resistance: The height places devices out of easy reach from ground level.
- Broad coverage area: Elevated positioning eliminates obstructions like shrubs or vehicles.
- Reduced vandalism risk: Would-be intruders cannot easily disable cameras mounted at this height.
For specific solar security camera models like the eufy S120, manufacturers recommend a slightly lower range of 5-8.2 feet to optimize both the viewing angle and solar panel exposure to sunlight. This adjusted height ensures the integrated solar panel receives maximum sun while maintaining effective surveillance coverage.
3: Prime Locations for Maximum Coverage
1. Front Entry Points: Your First Line of Defense
The front door area demands priority placement for any solar security camera system. With more than one-third of break-ins occurring at this location, comprehensive front entry coverage is non-negotiable.
Installation tips:
- Mount the camera to capture the full porch area and approach path.
- Position at an angle that shows faces of visitors before they reach the door.
- Ensure the field of view includes package delivery zones.
- Consider a second camera covering the front yard approach for advance warning.
2. Garage and Driveway Surveillance
Garages serve as both entry points and valuable asset storage, making them high-priority locations for solar security camera installation.
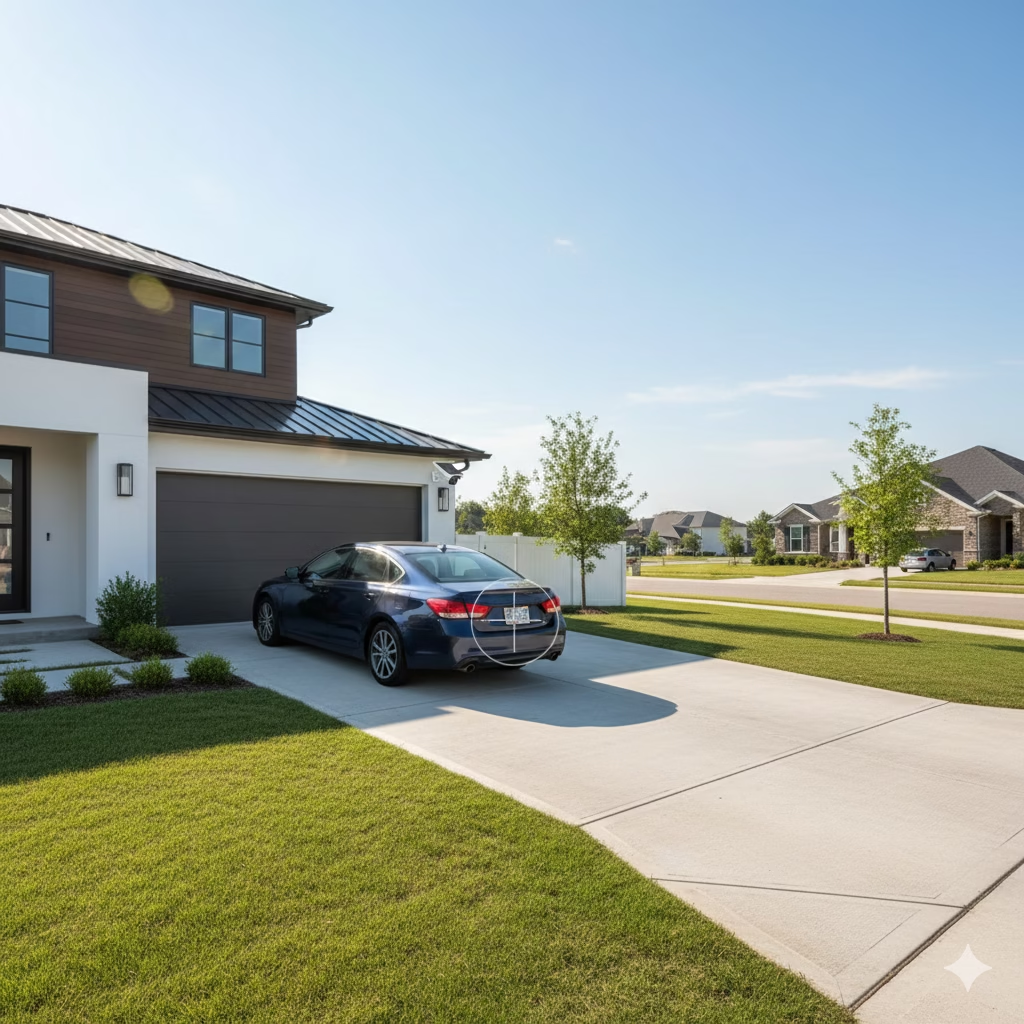
Best practices:
- Install on the garage exterior wall at a corner angle to cover the full driveway width
- Position to capture license plates of vehicles entering and exiting
- Angle cameras to monitor both the garage door and any side access points
- Ensure solar panels face optimal directions for all-day charging
3. Backyard and Side Entry Coverage
Backyards offer concealment for invader and often contain vulnerable access points like ground-floor windows and rear doors.
Strategic placement:
- Mount cameras high on exterior walls overlooking the entire yard
- Position to monitor gates, fences, and potential climbing points
- Cover patio areas and outdoor asset storage (grills, equipment, furniture)
- Overlap fields of view from multiple cameras to eliminate blind spots
4. Side Passages and Hidden Approaches
The narrow passages between buildings or along property sides create perfect concealment for invaders and perfect surveillance opportunities for well-placed solar security cameras.
Coverage strategy
- Install cameras at property corners to monitor two sides simultaneously
- Ensure coverage of first-floor windows accessible from these paths
- Position devices to capture anyone approaching from adjacent properties
- Maintain clear solar panel access despite narrow installation spaces
5. Remote and Perimeter Locations
Solar security cameras excel in off-grid locations where running power cables would be impractical or impossible.
Ideal remote spots:
- Garden sheds and detached outbuildings
- Property boundary fences and gates
- Rural access roads and driveways
- Agricultural equipment storage areas
- Construction site perimeters
4: Solar Panel Positioning: Maximizing Energy Capture
The solar panel component of your security camera requires careful orientation to ensure consistent charging regardless of weather conditions.
Hemisphere-Specific Orientation
Northern Hemisphere installations
- Face solar panels south for maximum sun exposure throughout the day
- Angle panels at a tilt equal to your local latitude for optimal year-round performance
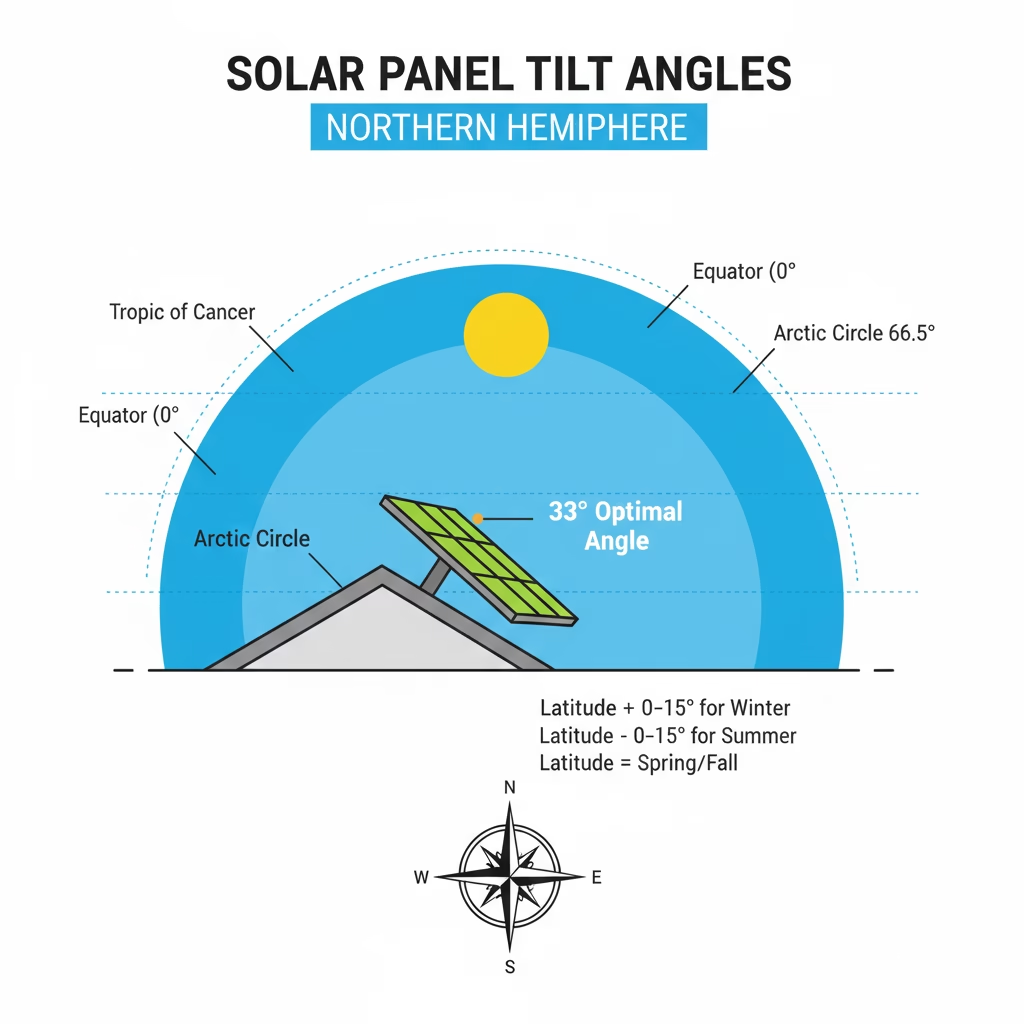
Example: In Los Angeles, California (34°N latitude), use a similar 33-34° tilt
Southern Hemisphere installations:
- Face solar panels north instead
- Apply the same latitude-based tilt principle
Seasonal Adjustments for Maximum Efficiency
While latitude-based angles work well year-round, you can optimize seasonal performance:
- Summer months: Reduce tilt by 10-15° to capture the higher sun angle
- Winter months: Increase tilt by 10-15° for lower sun trajectories
- Northern climates: Consider steeper winter tilts up to 60° to maximize limited sunlight
Avoiding Shadows and Obstructions
Even partial shading can dramatically reduce solar panel efficiency studies show that just 10% shading can decrease output by up to 80%.
Shadow avoidance checklist:
- Map sun paths throughout the day before installation
- Trim tree branches that may cause seasonal shading
- Account for nearby building shadows at different times of year
- Consider how shadow patterns will change as trees and vegetation grow
- Position panels for all-day sun exposure, not just peak midday hours
5: Technical Specifications for Optimal Coverage
Field of View and Lens Selection
Modern solar security cameras offer various field of view (FOV) options to match different surveillance needs:
- Wide-angle coverage (60-110°): Ideal for open yards, parking areas, and perimeters
- Standard coverage (90°): Perfect for entryways and targeted monitoring zones
- Narrow coverage (40-60°): Best for long driveways or specific point monitoring
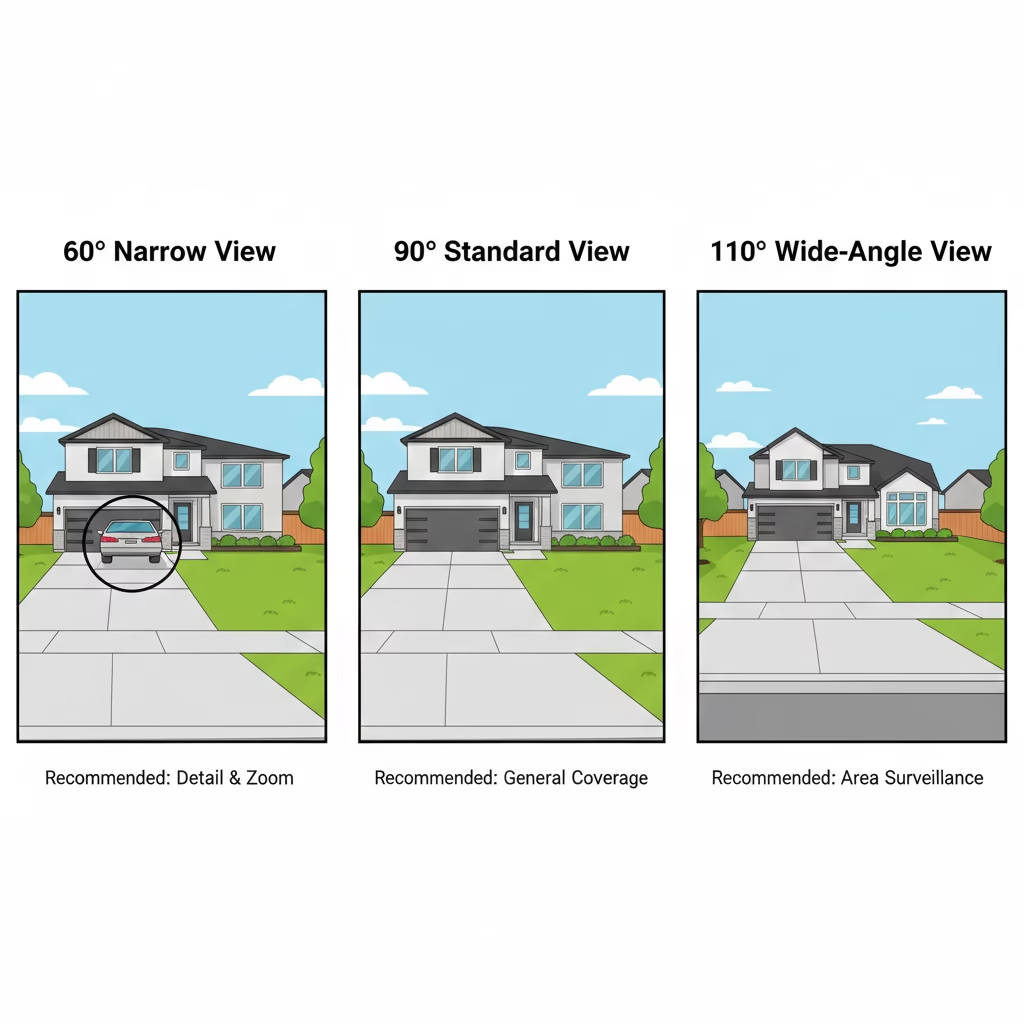
The 2.8mm focal length lens provides an excellent 90° field of view for most residential entry point applications, balancing coverage breadth with facial recognition detail.
Camera Angle and Tilt
Beyond horizontal positioning, the vertical angle of your solar security camera significantly impacts image quality:
- Recommended downward tilt: 20° from horizontal
- Benefits: Reduces sky glare, captures faces rather than tops of heads, minimizes sun exposure directly into the lens
- Avoid: Pointing cameras directly toward sunrise or sunset paths, which causes washout during golden hours
Advanced Features to Consider
Premium solar security camera models like the Reolink Argus 3 Pro offer enhanced capabilities:
- 2K resolution for superior detail capture
- Color night vision extending up to 10 meters (33 feet)
- Dual power options combining solar charging with backup battery
- Advanced motion detection with customizable zones to reduce false alerts
- Two-way audio for remote communication with visitors or intruders
Creating Overlapping Coverage Zones
Professional security installations avoid single points of failure by creating overlapping fields of view.
Overlap strategy:
- Position cameras so their coverage areas intersect at critical points
- Ensure no approach to your property exists without at least two camera views
- Use corner placements to maximize coverage with minimal camera count
- Test actual fields of view after installation theoretical angles don’t account for real-world obstructions
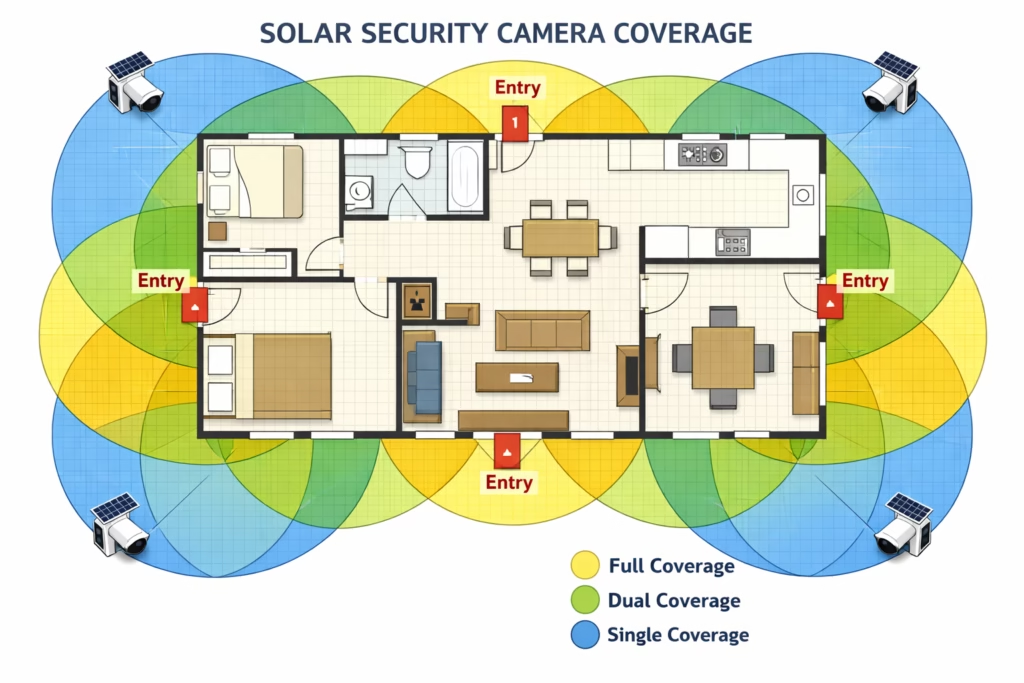
This redundancy means that if one solar security camera experiences technical issues or is deliberately obscured, adjacent cameras maintain surveillance of the same area.
Common Solar Security Camera Placement Mistakes
Avoid these frequent installation errors:
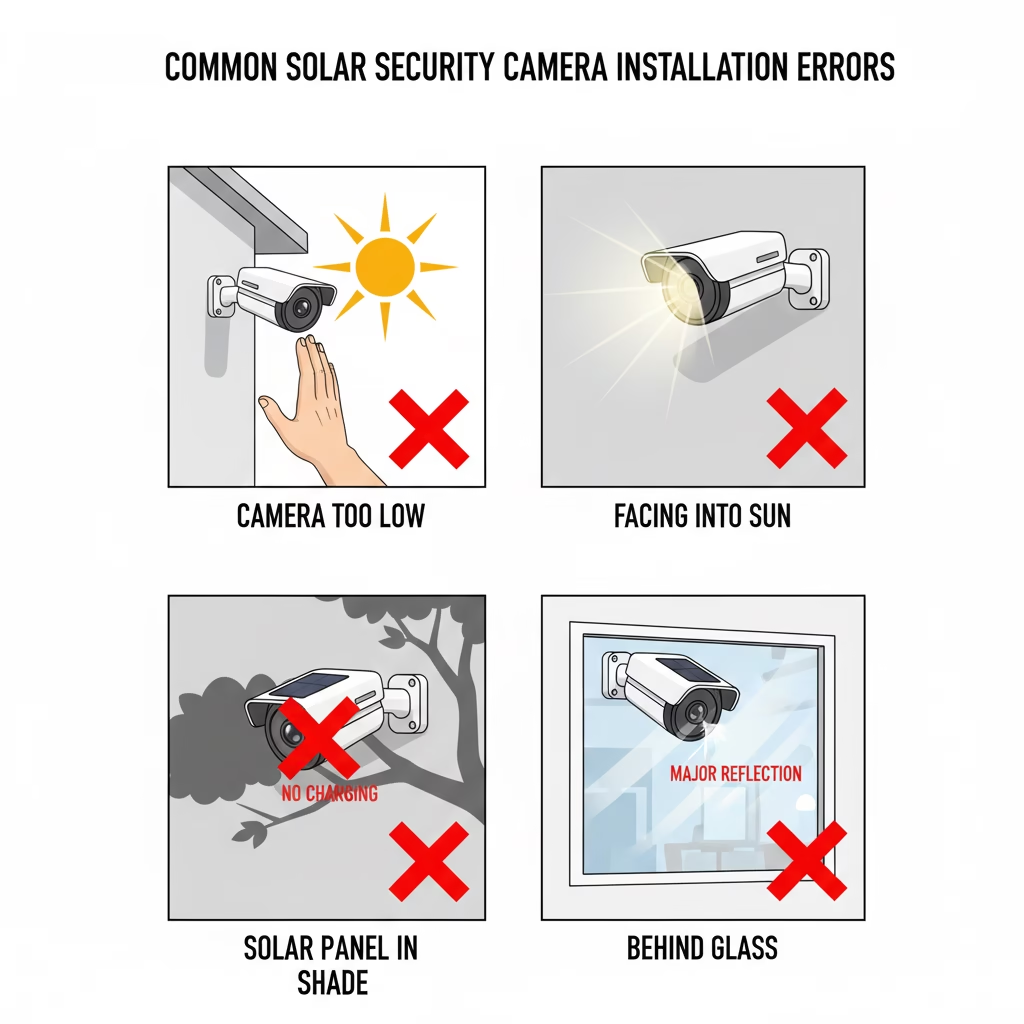
- Insufficient elevation: Mounting cameras below 7 feet makes them accessible to tampering and limits their field of view.
- Direct sun exposure: Pointing cameras toward bright light sources creates glare and washed-out footage during peak sun hours.
- Ignoring solar panel needs: Prioritizing camera angle while placing the integrated solar panel in permanent shade defeats the self-sustaining purpose.
- Poor Wi-Fi consideration: Installing cameras beyond reliable wireless range without cellular backup options.
- Installation behind glass: Mounting cameras behind windows interferes with motion sensors and creates reflection issues.
- Neglecting maintenance access: Placing cameras where cleaning solar panels or adjusting angles requires excessive effort.
6: Regional Considerations for Solar Security Camera Installation
Climate-Specific Factors
Hot, sunny climates:
- Prioritize shade for camera lenses to prevent heat-related malfunctions
- Position solar panels for maximum exposure—charging won’t be an issue
- Consider cameras with higher temperature ratings (up to 140°F/60°C)
- Cold, northern climates:
- Install with steeper winter tilt angles (up to 60°) for low-angle winter sun
- Choose solar security cameras rated for sub-zero temperatures
- Plan for snow clearing access to solar panels
- Consider models with heated lenses to prevent frost obscuring views
Heavily wooded properties:
- May require separate solar panel mounting away from camera locations
- Prioritize clearing vegetation for both camera views and solar access
- Consider higher-capacity battery systems to compensate for limited sunlight
7: Connectivity and Power Management
Wi-Fi Signal Strength Assessment
Before finalizing solar security camera locations, verify wireless connectivity:
- Test Wi-Fi signal strength at each proposed location using a smartphone app
- Walls, especially exterior masonry, significantly reduce wireless range
- Consider Wi-Fi extenders or mesh network systems for distant placements
- For remote properties, investigate cellular-enabled solar security cameras that don’t require Wi-Fi
Battery Backup and Charging Efficiency
Even with optimal solar panel positioning, seasonal variations and weather affect charging:
- Most quality solar security cameras include battery backup for 2-4 weeks of cloudy weather
- Monitor battery levels through manufacturer apps to identify insufficient charging issues
- Clean solar panels quarterly (monthly in dusty environments) to maintain peak efficiency
- Consider supplementary charging during extended periods of poor weather
8: Installation Planning Checklist
Before installing your solar security camera system:
Site Assessment:
- Map sun exposure patterns throughout the day at each location
- Identify potential shadow sources (buildings, trees, structures)
- Note seasonal sun path variations
- Verify Wi-Fi signal strength at each proposed location
Coverage Planning:
- Mark all entry points (doors, accessible windows, gates)
- identify high-value areas requiring monitoring
- Plan for overlapping fields of view
- Calculate camera quantity needed for complete coverage
Technical Preparation:
- Confirm mounting surface strength for each location
- Gather installation hardware suitable for surface types
- Verify camera specifications match coverage requirements
- Test equipment before permanent installation
Solar Optimization:
- Determine correct panel angle based on latitude
- Confirm unobstructed sun access for minimum 4-6 hours daily
- Plan maintenance access for panel cleaning
- Consider seasonal adjustments if implementing manual tilt changes
9: Conclusion
Strategic placement of solar security cameras requires balancing surveillance effectiveness with solar charging efficiency. By installing cameras at optimal heights of 8-10 feet, positioning them at critical locations like entry points and high-traffic areas, and orienting solar panels for maximum sun exposure, you create a self-sustaining security system with comprehensive coverage.
The independence offered by solar security cameras freedom from wiring constraints and electrical costs makes them ideal for both traditional residential installations and remote property monitoring.Take time during installation to verify both surveillance coverage and solar charging capability.