Explore how solar indoor ceiling lights work, including key facts, specs, and the top 5 picks to help you choose the right option for reliable indoor lighting.
The solar indoor lights handbook approach makes it easier to understand how solar indoor ceiling lights actually works. Electricity costs keep raising but you need lights and you have to bring the electricity bills down. You can do this by placing indoor ceiling lights on your garden sheds, small cabins, garages, storage rooms, and backup lighting inside homes during outages. Running wiring for these place will be expensive and often not worth the trouble for smaller spaces.
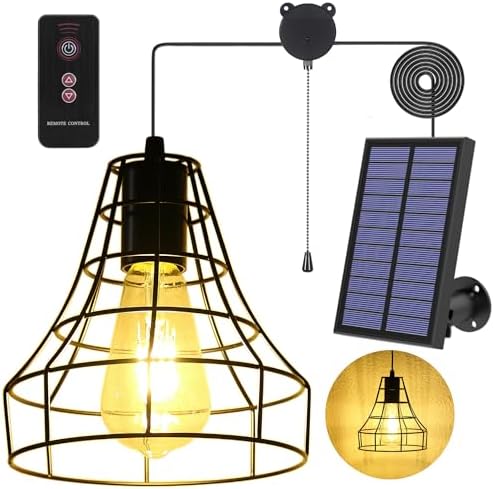
The solar indoor ceiling lights are not the same as typical outdoor solar lights. They use a split system design. The solar panel sits outside on the roof or wall where it gets more sunlight, while the ceiling light fixture is installed indoors. Both parts connect with a cable, so you get clean indoor lighting powered by the sun.
1.How Do Solar Indoor Ceiling Lights Work? The Mechanics
Solar indoor ceiling lights use a simple but smart layout that makes them different from regular solar garden lights. Instead of putting everything in one unit, they use a split system design.
The Split System Design
In a split system, the solar panel and the light fixture are two separate parts.
The solar panel is mounted outside where it can receive direct sunlight. This is usually on a roof edge, exterior wall, pole, or fence. Inside the panel unit, there is either abuilt-inn battery or a connected battery pack that stores the energy collected during the day.
The ceiling light fixture is installed indoors, just like a normal ceiling lamp. It contains the LED board, diffuser, and control receiver for the remote or pull cord.
Because the panel is outside and the light is inside, you get proper indoor illumination without needing any grid wiring.
The Cable Connection
Both parts are connected with a long, low-voltage cable. Most standard kits include around 5 meters or 16 feet of wire. Some higher-end models offer longer cables or extensions.
This cable carries power from the charged battery to the light fixture. Since the voltage is low, the setup is safer than traditional AC wiring and usually DIY friendly.
Cable length is not a small detail. Before buying, it is important to measure the distance from your planned panel location to your indoor mounting point. If the cable is too short, the system becomes hard to install cleanly.
Battery Technology Inside
Most modern solar indoor lights use one of two battery types:
LiFePO4 batteries
- Longer cycle life, often 2000 plus charge cycles
- Better thermal stability and safety
- More consistent performance over time
Lithium-ion batteries
- Lower cost
- Lighter weight
- Shorter average lifespan compared to LiFePO4
During the day, the panel charges the battery in about 6 to 8 hours of good sunlight. At night, the stored energy powers the LED ceiling light for roughly 8 to 12 hours, depending on brightness mode and battery size.
2.Key Benefits and Drawbacks of Solar Indoor Ceiling Lights
Solar indoor ceiling lights are a practical off-grid lighting solution, but they are not perfect for every situation. Understanding the real advantages and limits will help you avoid buying the wrong type for your space. Here is a straight, practical breakdown.
Why Many People Choose Them
– Zero electricity cost: Once installed, these lights run on sunlight. There is no grid power use and no added utility bill. For sheds, garages, and small rooms, this can fully replace wired lighting.
– Works during power outages: Because they are independent systems with built-in batteries, they continue to work during blackouts and load shedding. That makes them useful as emergency indoor lighting.
– DIY friendly and low voltage: Most systems run on low voltage, commonly between about 3.2V and 6V. That reduces shock and fire risk compared to AC wiring. Installation usually involves screws and one cable passing through the wall or roof edge, not full electrical work.
– Good fit for non-wired spaces: They are ideal where running wires is expensive or not allowed. Examples include rental properties, farm sheds, cabins, storage rooms, and temporary structures.
What to Watch Out For
– Sunlight-dependent performance: Charging depends on direct sun exposure. Cloudy weather and winter days reduce charging speed and total stored energy. That can shorten nightly runtime unless the battery capacity is large.
– Battery wear over time: Batteries do not last forever. Most will show noticeable capacity drop after about 2 to 5 years, depending on battery type and usage cycles. Units with LiFePO4 cells usually last longer than standard lithium-ion cells.
– Visible cable routing: Since the panel is outside and the light is inside, a cable must run between them. Even when neatly installed, some visible wiring is usually unavoidable. For some rooms, this affects the look.
– Limited smart features: Most solar ceiling lights use simple remotes, pull cords, or motion sensors. Smart home integration with WiFi or voice assistants is still uncommon in this category.
3.Critical Specs: How to Choose the Right Solar Indoor Ceiling Light
Not all solar indoor ceiling lights perform the same. Small spec differences can change how useful the light feels in daily use. Before buying, focus on these core factors instead of just the product photos.
Brightness (Lumens)
Lumens tell you how bright the light actually is. This matters more than “watt equivalent” labels.
Quick reference points:
- Around 300 to 500 lumens works for small sheds and storage areas
- Around 600 to 900 lumens fit single garages and medium rooms
- 8800-pluslumens is closer to a standard 60W household bulb
- 1000 to 1500 lumens is better for main room lighting or workshops
If the light includes dimming modes, the runtime increases when used at lower brightness. That helps during winter or cloudy weeks.
Color Temperature
Color temperature changes how the room feels and how well you can see detail. It is measured in Kelvin.
3000K Warm White
- Softer and more yellow tone
- Better for bedrooms, living spaces, and cabins
4000K Neutral White
- Balanced tone
- Good for mixed-use rooms
6000K to 6500K Cool White
- Bright and crisp tone
- Best for garages, task areas, and workshops
Some solar ceiling lights let you switch color temperature with a remote. That gives more flexibility if the space has multiple uses.
Control Options
Control style affects daily convenience more than most buyers expect.
Common options include:
- Remote control with brightness levels and timers
- Pull the cord on and off the switch
- Motion sensor activation
- Wall style low voltage switch (on some models)
Remote-controlled units are usually the most flexible. Timer and dimming modes help extend battery runtime and reduce manual switching.
Cable Length
Cable length is a make-or-break spec for split solar lighting systems.
Most standard kits include about 5 meters or 16 feet of cable between the panel and the light. Some offer longer cables or extensions, but many do not.
Always measure first:
- Panel mounting spot to cable entry point
- Entry point to ceiling fixture location
Also, check the connector size. A slimmer or detachable connector makes it easier to pass through a drilled hole and seal it properly against moisture.
4.Top 5 Types of Solar Indoor Ceiling Lights (Product Suggestions)
This section covers the main styles of solar indoor ceiling lights you’ll encounter and how each fits a particular use case. These aren’t brand endorsements but real types you can find from major marketplaces and solar lighting retailers. Solar indoor ceiling lights are often sold with remote control, adjustable brightness modes, and multicolor temperature options.
1. Flush Mount Solar Ceiling Lights
Best For: Living rooms, bedrooms, and main interior spaces
These look similar to standard ceiling light fixtures you’d use in a home. They are a good choice when you want a clean, integrated look rather than something that stands out as “solar.” Many come with a remote control for dimming and switching between warm white and cool white.
Why choose it: good overall light spread, more polished aesthetic.
2. Dual-Head Solar Pendant Lights
Best For: Workshops, garages, or large shed interiors
These lights have two separate lamps on a single system, useful if you want to illuminate two distinct zones. Each head can often be adjusted or controlled independently. The outdoor solar panel still feeds a central battery pack.

Why choose it: directional lighting and flexibility for wide spaces.
3. Solar Tube/Batten Lights
Best For: Garages and workbench areas
These are long, linear lights similar to traditional fluorescent battens. They cast light evenly across benches or long spaces and are usually powerful enough for task-heavy areas.

Why choose it: focused, bright light for work areas.
4. Solar Skylight Panels
Best For: Hallways, bathrooms, and windowless rooms
These panels are designed to mimic natural skylighting effects, offering bright, diffused illumination over a wider area. They can be paired with motion sensors to save battery when the room is unoccupied.
Why choose it: Broad, natural-looking light is ideal for everyday interior spaces.
5. Motion Sensor Solar Ceiling Lights
Best For: Entrances, stairwells, and utility spaces
These compact dome or semi-flush fixtures include a motion detector, so they only light up when movement is detected. That saves battery life and adds convenience where constant light is not required.

- 🔋→💡Efficient Solar Energy Conversion: TECKNET environmentally conscious solar motion lights outdoor harness sunlight and…
- 🔆416 LEDs Enhanced Brightness: TECKNET motion lights for outside boast 416 LED beads and an innovative reflective light …
- 3️⃣3 Lighting Modes: TECKNET solar motion lights outdoor offer 3 modes to cater to various needs: continuous medium-ligh…
Why choose it: energy savings and automatic activation.
5.Installation and Maintenance Guide
One reason solar indoor ceiling lights are popular is their simple installation. Most kits are designed for DIY users and do not require an electrician. You just mount the panel outside, run the cable inside, and fix the light to the ceiling.
Here is a practical step-by-step approach.
1. Choose the solar panel location
Pick a spot that gets strong direct sunlight for most of the day. Roof edges, upper exterior walls, or poles usually work well.
Best practice:
- Face the panel toward the south in the northern hemisphere
- Avoid shade from trees, vents, or nearby buildings
- Tilt the panel slightly instead of mounting it flat when possible
- More sun exposure directly improves nightly runtime.
2. Plan the cable path
Check the included cable length first. Most are around 5 meters or 16 feet.
Plan a clean path:
- From panel to wall or roof entry point
- From the entry point to the ceiling mounting spot
- Avoid sharp bends and pinch points
Drill a small hole just large enough for the connector. If the connector is detachable, installation becomes easier.
3. Weatherproof the entry hole
After passing the cable through, seal the gap.
Use:
- Outdoor silicone sealant or weatherproof caulk
- A rubber cable gland, if you want a cleaner finish
- This prevents water and insects from entering.
4. Mount the indoor light fixture
Most units use screws and wall plugs or a mounting plate.
Typical process:
- Mark the screw points
- Drill pilot holes
- Fix the mounting plate
- Connect the cable
- Twist or clip the light into place
- Test the remote or switch before final tightening.
Basic Maintenance Tips
Solar indoor ceiling lights need very little upkeep, but small habits make a big difference.
– Clean the solar panel regularly: Dust and dirt can reduce charging efficiency by a noticeable margin. Wipe the panel every few weeks with a soft, damp cloth, especially in dusty orpollen-heavyy areas.
– Check cable and connectors: Every few months, inspect:
- Cable insulation
- Outdoor connector points
- Mounting screws
- Look for cracks, looseness, or corrosion.
– Manage battery health: If the light has brightness modes, avoid running max brightness every night unless needed. Moderate modes extend battery cycle life. Expect battery replacement in roughly 2 to 5 years, depending on battery type and usage.
6. Conclusion
Solar indoor ceiling lights offer a practical way to bring reliable lighting to places where grid wiring is expensive, difficult, or simply not available. With a split system design, low-voltage operation, and built-in battery storage, they give you usable indoor light powered entirely by sunlight.
The key is choosing based on real specs, not just product photos. Focus on lumen output for brightness, battery type and capacity for runtime, cable length for install flexibility, and color temperature for the kind of space you are lighting. Flush mount styles work well for living areas, pendant and batten types suit sheds and workshops, and motion sensor models are ideal for entry points and utility zones.
For most first-time users, starting with a simple solar pendant or dual-head shed light is a smart move. It is easy to install, budget-friendly, and gives a clear idea of how solar indoor lighting performs in your local conditions. From there, upgrading to higher output ceiling fixtures for main rooms becomes much easier.