Common solar security camera installation mistakes can drain batteries and ruin footage. Learn correct panel direction, tilt, camera height, motion settings, and WiFi setup for reliable performance.
1. Camera Positioning Mistakes That Ruin Footage
Correct camera positioning is not just about what the lens can see. With solar security cameras, placement directly affects both image quality and battery life. These cameras rely on PIR motion sensors and smart event recording, which behave differently from always-on wired systems. Small angle and height mistakes can lead to unusable footage and fast battery drain.
1.1. Mounting Too High
A very common mistake is placing the camera too high for “extra coverage.” It sounds smart, but it often backfires. Most 2K and 4K consumer security cameras struggle to capture clear facial detail beyond about 20 to 25 feet. When mounted above 12 feet, the viewing angle becomes too steep. Instead of faces, the camera mostly records the tops of heads and hats. This is sometimes called hoodie blindness.
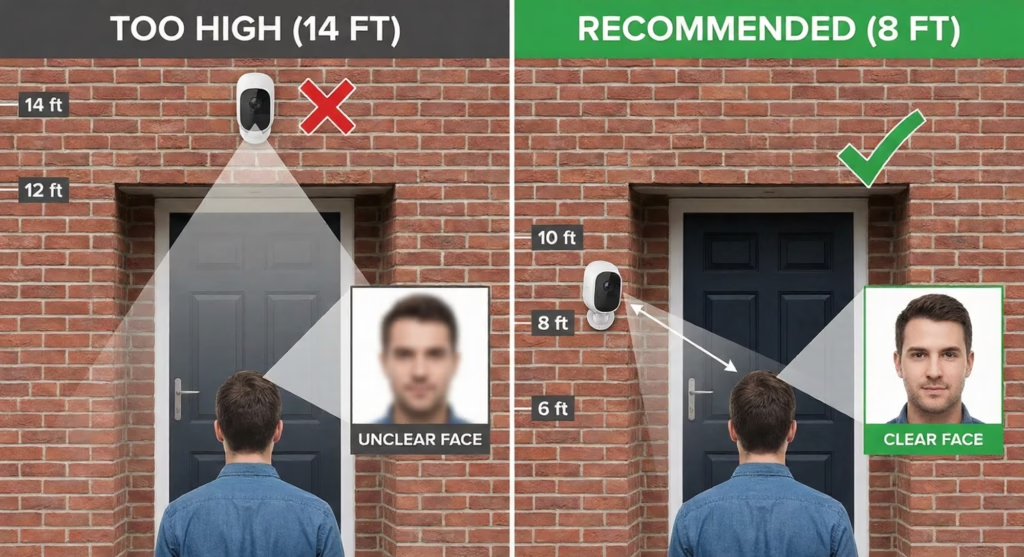
The better approach is the 7 to 9 foot mounting zone. It gives a more natural face angle while still keeping the camera out of easy reach. This height also improves PIR motion detection accuracy because people move across the sensor field instead of directly toward it.
1.2. Aiming Directly at Busy Streets or Traffic
Solar cameras usually use PIR sensors that detect heat movement, not pixel changes. That saves power, but it also creates a placement trap. If the camera points at a busy street, sidewalk, or driveway with constant vehicle flow, the sensor may trigger over 100 times per day. Each trigger wakes the camera, records video, and uses WiFi to send alerts. That burns through the battery quickly.
Most solar camera batteries are designed for around 10 to 20 motion events daily. A better setup is to angle the camera so the street sits just outside the active motion zone. Sensitivity settings can also be reduced to around 60 to 70 percent to cut false triggers while still catching real activity.
1.3. Facing Direct Light Sources
Pointing a camera straight toward sunrise or sunset causes another major problem: glare and backlighting. When a camera faces East or West, it will be partially blinded for hours each day. The strong background light turns subjects into dark shapes. This silhouette effect makes identification difficult and sometimes impossible.
The cleaner approach is to aim cameras North or South whenever possible. If that is not practical, tilt the camera slightly downward so the bright horizon stays out of frame. This improves exposure balance and keeps faces visible instead of shadowed.
2. Motion Detection and Power Drain Errors
Motion detection is where solar security cameras save power, but it is also where many installations quietly fail. These cameras are not meant to record nonstop. They wake up only when motion is detected, record a short clip, then go back to sleep to conserve battery.

When motion settings are poorly configured, the camera wakes up far too often and burns through its daily energy budget.
2.1. Confusing PIR Detection With Pixel Detection
Most solar-powered security cameras use PIR sensors instead of pixel-based motion detection. PIR reads heat movement across its detection field, not tiny visual changes in the frame.
This means motion works best when a person walks across the camera view, not straight toward it. If a camera is aimed down a long path or driveway, detection can be delayed or missed because there is little cross movement. A slight side angle usually improves trigger reliability and reduces missed events.
2.2. Sensitivity Set Too High
Many users leave motion sensitivity at maximum. That often causes constant triggers from:
- Moving tree branches
- Sun-heated surfaces are cooling down
- Pets and small animals
- Heat shimmer from the pavement
false alert forces the camera to wake, record, and transmit. That repeated cycle drains the battery faster than expected.
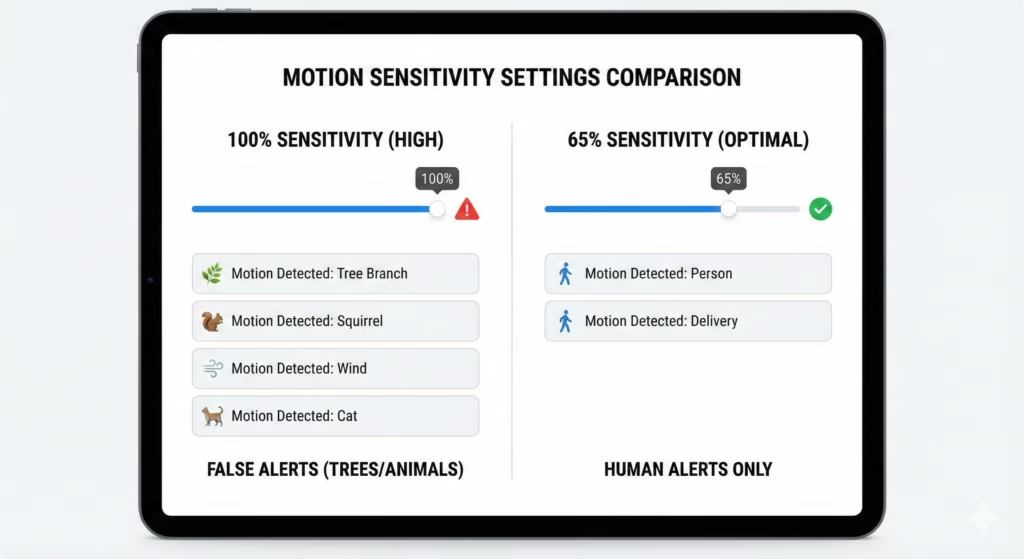
A practical starting point is 60 to 70 percent sensitivity. From there, adjustments can be made based on real alerts instead of guesses.
2.3. No Activity Zones Defined
Activity zones tell the camera where motion actually matters. Without zones, the entire frame becomes active. That includes background areas like roads, sidewalks, and neighbor property.
Defining tight motion zones around doors, gates, and entry paths can dramatically reduce daily triggers. Fewer triggers mean longer battery life and more useful alerts.
2.4. Recording Length Set Too Long
Long clip length feels safer, but it costs power. Recording 30-second clips for every small motion event multiplies energy use quickly.
Shorter clips with quick retrigger ability usually work better for solar cameras. Many setups perform well with 10 to 15-second clips, unless the area truly needs longer capture time.
3. Connectivity and Setup Mistakes
Connectivity problems are often blamed on the camera, but most of the time they come from network setup choices. Solar cameras are built for efficiency and range, not high bandwidth streaming. That changes what kind of WiFi setup works best.
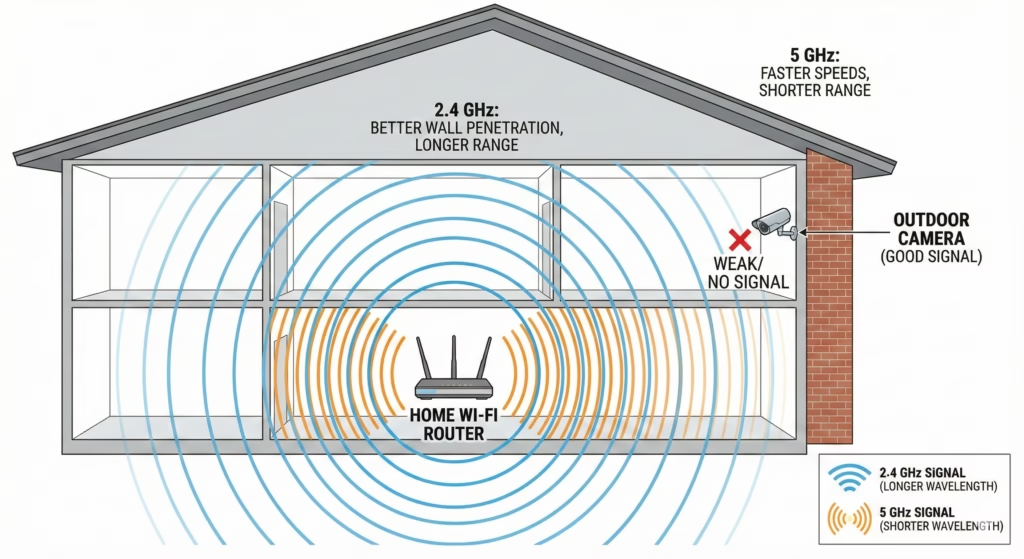
3.1. Using the Wrong WiFi Frequency Band
A common setup failure happens when users try to connect the camera to 5 GHz WiFi because it sounds faster. Speed is not the priority for solar cameras. Stability and range are. Most solar camera models support 2.4 GHz only because:
- It travels farther
- It passes through walls better
- It uses less power to maintain a connection
If the phone used for setup is connected to 5 GHz, pairing may fail or behave inconsistently. The simple fix is to switch the phone to the 2.4 GHz band before starting installation.
3.2. Weak Signal at the Mounting Location
Signal strength at the install spot matters more than signal strength inside the house. A camera mounted outside on a wall or pole may have much weaker coverage than a phone indoors.
A good target is around 60 dBm or better at the camera location. Weaker signals force the device to boost transmission power and retry uploads, which increases battery usage. Most camera apps show signal strength during setup. If the number is poor:
- Move the router closer
- Add a WiFi extender
- Reposition the camera a few feet
- Avoid thick concrete or metal barriers
3.3. Skipping a Signal Test Before Final Mounting
Another frequent mistake is permanently mounting the camera first and testing later. That can lead to reinstallation work if the signal turns out weak.
A smarter approach is to test the camera connection at the exact planned height and position before drilling or tightening mounts. A quick live view and signal check can prevent hours of rework.
4. Cold Weather and Battery Limit Mistakes
Cold weather creates a hidden problem that many solar security camera owners do not expect. The panel may get sunlight, but the battery still refuses to charge. This is not a defect. It is how standard lithium-ion batteries are designed to protect themselves.
4.1. Not Understanding Lithium Ion Charging Limits
Most solar cameras use lithium-ion batteries. These batteries include a safety cutoff that stops charging at or below 32°F or 0°C. Even if the panel is producing power, the battery controller blocks charging to prevent damage.
The result is confusing for many users. The camera works during the day, sunlight is available, but the battery percentage does not increase. Planning for this behavior is important in cold regions.
4.2. Installing Budget Solar Cameras in Harsh Winter Zones
Many entry-level solar cameras are built for mild to moderate climates. They often lack:
- Cold weather battery chemistry
- Internal battery heaters
- Advanced thermal regulation
- In freezing conditions, these models may run but not recharge properly for days or weeks.
Before installation, it helps to check the operating and charging temperature ratings, not just the recording resolution and features.
4.3. No Winter Charging Backup Plan
In colder climates, a backup charging plan prevents downtime. Without one, the camera can slowly discharge and shut off during long, cold spells. Practical winter strategies include:
- Choosing models rated for extreme cold
- Using removable batteries and rotating them indoors for charging
- Mounting cameras where they get maximum winter sun
- Increasing panel tilt for better low sun capture
- Reducing motion sensitivity during the winter months
Snow buildup should also be cleared from panels. Even a thin layer can block most sunlight and stop charging completely.
5. Advanced Installation Optimization Tips
Once the basic mistakes are avoided, a few advanced adjustments can noticeably improve solar camera reliability and recording quality. These steps are often skipped, but they make a real difference over long-term use.
5.1. Adjust Panel Tilt by Season
Many people set the solar panel angle once and never revisit it. Seasonal sun angle changes can reduce charging efficiency, especially in winter.
A useful rule:
- Winter tilt = latitude plus about 15 degrees
- Summer tilt = latitude minus about 10 to 15 degrees
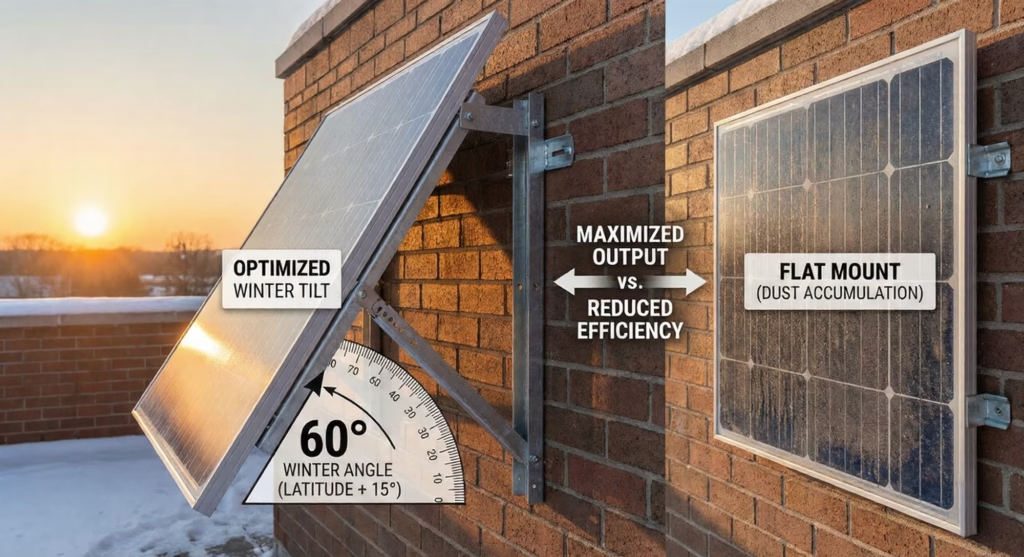
If the mount is adjustable, a quick seasonal tweak can improve daily energy harvest without moving the camera.
5.2. Align Detection With Real Movement Paths
Instead of pointing the camera broadly at an area, focus on likely approach paths:
- Walkways
- Gates
- Door approaches
- Driveway entry points
PIR sensors respond best to cross movement. When people walk across the frame instead of directly toward the lens, detection is faster and more reliable. This reduces missed events and avoids wasted triggers from distant background motion.
5.3. Tune Event Length and Cooldown
Many solar cameras allow control over:
- Clip length
- Retrigger delay
- Cooldown time between events
Shorter clips with a smart cooldown often outperform long clips with no delay. The camera records what matters while conserving battery between events. This balance keeps the energy budget stable over weeks, not just days.
5.4. Use Signal and Sun Tests Before Final Tightening
Before locking mounts in place, run two quick tests:
- Live view and signal strength check
- One full day of sun exposure check
Temporary positioning with test data helps confirm that both connectivity and charging are strong. After that, finalize the mount with confidence instead of guesswork.
6. Quick Success Checklist for Solar Security Camera Installation
Before finishing your solar security camera setup, it helps to run through a simple verification checklist. This turns all the technical details into a quick field guide you can actually use during installation.
Use this as a final pass to avoid the most common performance and battery drain problems.
6.1. Solar Panel Setup Checklist
- Panel faces True South in the Northern Hemisphere (True North in the Southern Hemisphere)
- Panel gets at least 4 to 6 hours of direct sun daily
- No partial shading during peak hours (10 AM to 2 PM)
- Tilt angle set close to latitude plus 15 degrees for winter performance
- The panel is not mounted flat and can shed dust and debris
6.2. Camera Position Checklist
- Mount height between 7 and 9 feet
- Camera angle captures faces, not just the tops of heads
- The field of view avoids busy streets and constant traffic
- The camera is not pointed directly at the sunrise or sunset glare
- Detection works across walking paths, not only straight approach lines
6.3. Motion and Power Settings Checklist
- Motion sensitivity is around 60 to 70 percent to start
- Activity zones drawn around real entry points only
- Clip length kept moderate, not excessive
- Daily motion events kept near 10 to 20 triggers when possible
6.3. Connectivity Checklist
- Connected to the 2.4 GHz WiFi band
- Signal strength at install spot about −60 dBm or better
- Live view tested at final mounting location
- Router or extender positioned to support the camera reliably
6.4. Cold Weather Checklist
- Camera rated for expected winter temperatures
- Plan for charging limits below freezing
- Panel tilt adjusted for low winter sun
- Snow and debris were cleared from the panel surface
7. Conclusion
Solar security cameras are reliable when installed with precision, but they are less forgiving than wired systems. Every decision about angle, height, direction, and sensitivity affects the energy budget that keeps the camera alive each day.
Most failures are not caused by bad hardware. They come from small setup mistakes like wrong panel direction, too many motion triggers, weak WiFi signal, or poor tilt angles. Fixing these details usually restores stable performance without replacing the device.
A well-installed solar camera should maintain charge, capture clear faces, and send useful alerts without constant manual charging. Taking a few extra minutes to verify placement, sun exposure, and settings pays off with better coverage and fewer surprises.